 |
| Photo credit: Chai Green |
A couple weeks ago, I had some friends over for a hands-on dinner party, and we tackled two of my 2015 food goals in one night: pasta and panna cotta. I made the pasta dough and panna cotta ahead of time, and once my friends arrived, I put them to work helping roll pasta.
For the pasta dough, I used the recipe from Cooking at Home with the Culinary Institute of America. Basically all you need is flour, a bit of salt, egg, and a bit of oil. For rolling and handling technique, I found this article from Serious Eats to be very helpful. It's also a good read if you like to get real nerdy about your food. We used the old-school hand crank pasta rollers and cutters, for which you really do need two people--one to turn the crank and hold the machine in place, and one to feed the dough through the rollers and catch it as it comes out. I don't understand how people manage a hand crank roller by themselves! Making fresh pasta was a lot of work, but it was fun work with friends who were willing to pitch in and work for their dinner. And it tasted so good!
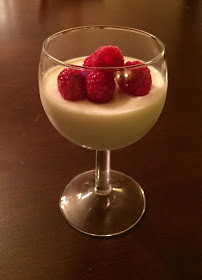
It was Lynn Rosetto Kasper of The Splendid Table podcast who inspired me to make panna cotta, so I originally planned to use her recipe. However, she uses sour cream in hers, and I couldn't find lactose-free sour cream for my lactose-intolerant guest, so I used The Kitchn's recipe instead. It tasted delicious, looked and felt fancy, and was actually really easy to make. And you can easily vary it up with different toppings or even different kinds of milk or flavorings. I will definitely make panna cotta again. See tips and topping ideas in the notes below the recipe.
Also, for an appetizer that night, I made simple peach-basil crostini. Simply slice a baguette, spray or brush lightly with olive oil, and spread out on a baking sheet. Then broil for just a few minutes until toasted (watch closely!). Then chop up some fresh peaches, and toss it with some thinly sliced fresh basil. Scoop the peach-basil mixture onto the crostini, and you've got a tasty, summery bite. A bit of ricotta or creamy goat cheese probably would have been a nice addition. Bonus: the peach-basil mixture tasted sublime on the panna cotta.
Panna Cotta
From The Kitchn
Yield: 6 servings (6 oz. each)
Ingredients
1-1/2 cups whole milk
1 Tbsp. powdered gelatin
1/3 cup sugar
1-1/2 cups heavy cream
1 tsp. pure vanilla extract
Pinch of salt
Fresh raspberries, chopped fresh peaches, or other toppings of choice (see notes)
Directions
Pour the milk into a saucepan (off the stove) and sprinkle the gelatin evenly over the top. Let sit for 5 minutes. The surface will get wrinkly and the gelatin will be slightly dissolved.
Set the saucepan over low heat and warm the milk gently, whisking frequently. The milk should never boil, simmer, or even start steaming. If it starts to steam, remove it from the heat and let it cool slightly. The milk should get warm, but not so hot that you can't hold your finger in there for a few seconds. After about 2 minutes of warming, rub a bit of the milk between your fingers to make sure it's smooth and doesn't feel gritty at all.
Add the sugar to the milk, whisk it, and continue warming until the sugar is dissolved. Again, make sure the milk doesn't get too hot. This whole process of dissolving the gelatin and the sugar shouldn't take more than 5 minutes.
Remove the saucepan from the heat. Whisk in the cream, vanilla extract, and a pinch of salt. Let the mixture sit out so it cools to room temperature. Whisk it again, then pour into wine glasses, ramekins, or other container of choice. Chill for 1-2 hours or more. The longer it chills, the firmer it will be. Add toppings of choice and serve.
Notes
- Topping ideas: Fresh raspberries, blackberries, and strawberries (puree some for a sauce, if desired). Chopped fresh peaches, tossed with fresh basil, if desired. Drizzle of thick, good-quality balsamic vinegar. Drizzle of honey.
- The gelatin we're using here is plain, unflavored, unsweetened gelatin. In other words, not Jello. I found it in the Jello and pudding section of the grocery store, and the brand I got looks like this. It had 4 little envelopes of gelatin powder, and it took almost two envelopes to measure 1 Tbsp.
- When I got ready to pour the milk mixture into the wine glasses, I found it helpful to line a cookie sheet with non-slip shelf liner, then put the wine glasses on that. It made it easier to move them into the fridge all at once with no slip 'n' slide action.
- The Kitchn has two panna cotta articles that I found helpful: How to Make Panna Cotta and Why Panna Cotta Is the Perfect Dessert. In both articles, she mentions that sometimes the milk and cream can separate into layers of lighter and heavier fat levels while the panna cotta chills. In the first article she recommends using half and half (instead of milk plus cream) to combat this, and in the second article she recommends allowing the mixture to come to room temp and whisking again before pouring into ramekins. I went with the latter solution, as you see in the recipe above.
- If you want to unmold your panna cotta to serve it, see the instructions in the How to Make Panna Cotta article linked above.


